Posts Tagged ‘laptop’

Dell Touchpad Losing Multitouch After Second User Logs In

Friday, January 7th, 2022

Happy 2022! This dear old blog is long overdue for a theme update, eh?

My aging Dell E5550 has been losing the multitouch features (i.e. two finger scrolling in web browsers!) when a second person borrows my laptop (for work from home!).

This is in Windows 10. It may or may not apply to other laptops from Dell or other laptops that use the same OEM Touchpad from Alps Alpine.

There were some random webpage references to try specific older versions of the touchpad driver. I tried a couple upgrades and downgrades of the driver, but it didn’t seem to work.

So… I came up with a workaround. I created a little command script that kills 5 relevant processes and restarts them. It must be run with administrator privileges. Also… it’s probable that not all 5 are required to be restarted, but I didn’t feel like triaging it any further.

I’m doing this quick post because 1) it took way too long for me to spend fixing this stupid issue, and hopefully it helps someone else, 2) this blog has been silent for too long anyway.

Copy the code block below into a new “.cmd” file. And run it. Or make a shortcut and drag that shortcut into your Start Menu for easier access. Enjoy!

REM MUST RUN AS ADMIN! (In Advanced options of a short cut in Start Menu there is an Administrator permissions checkbox)
REM Workaround to fix TouchPad multi-touch when multiple users log in.
REM By Leonard Chan, Perceptus Solutioins Inc., www.perceptus.ca

REM 2022-01-04

taskkill /IM Apoint.exe
PING -n 3 127.0.0.1>nul

taskkill /IM ApntEx.exe
PING -n 3 127.0.0.1>nul

taskkill /IM ApMsgFwd.exe
PING -n 3 127.0.0.1>nul

REM This one needs more permissions for some reason.
taskkill /F /IM HidMonitorSvc.exe
PING -n 3 127.0.0.1>nul

taskkill /IM hidfind.exe
PING -n 3 127.0.0.1>nul

REM double quotes needed for optional title parameter if second parameter has quotes.
start "" "C:\Program Files\DellTPad\Apoint.exe"
PING -n 3 127.0.0.1>nul

start "" "C:\Program Files\DellTPad\ApntEx.exe"
PING -n 3 127.0.0.1>nul

start "" "C:\Program Files\DellTPad\ApMsgFwd.exe"
PING -n 3 127.0.0.1>nul

start "" "C:\Program Files\DellTPad\HidMonitorSvc.exe"
PING -n 3 127.0.0.1>nul

start "" "C:\Program Files\DellTPad\hidfind.exe"
PING -n 3 127.0.0.1>nul

ECHO Auto closing in about 60 seconds...
PING -n 60 127.0.0.1>nul

REM PAUSE
Dell Laptop A/C Power Cable Images

Saturday, February 12th, 2011

After a month of off-and-on power issues with my Dell Inspiron 1525 Laptop, the A/C power adapter finally stopped powering the laptop. It had stopped being identified as an authentic Dell charger a couple months ago, as I wrote about here.

I was quite certain that the power cable had broken internally due to the constant flexing.  It’s happened on almost every laptop that I’ve owned.  Slightly jiggling the power cable approximately where it flexes during natural use would cut power to the laptop.  Putting little stresses in the cable with twist ties would sometimes make the power work for a few days.  These fixes were really temporary – they only  put off the inevitable complete failure.

The options are to buy a band new authentic Dell PA-12 (or higher rated) power adapter for more than $100 directly from Dell, buy a 3rd party “compatible” charger for about $20 from eBay or DealExtreme.com (but I don’t trust 3rd party items when they plug into the household power… I don’t like fires), find a used authentic charger, or cut the cord and solder things up again.

So, the other day I cut the cable.  Here are a couple pictures that might make it easier for anyone who needs to do this in the future.


Dell Laptop Cable Inside - Cable Half

Dell Laptop Cable Inside - Cable Half


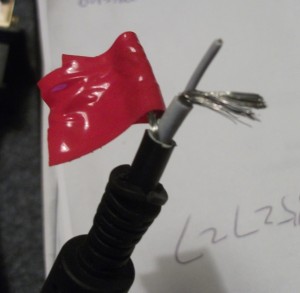
This is the cable half of the cut. You can see the top of the magnetic field minimizers… the name of which escapes me right now. There are three conductors. The tiny one in the center is for the chip in the PSU that tells the laptop whether or not the charger is an authentic Dell device – in my case, this broke months ago, when the Dell battery stopped charging – even after re-soldering, this charger still does not register as authentic; there must be another break further up the cable. Then two more layers of conductors.  I’ve covered off the outermost in red tape as I prepare to re-solder things together.


Dell Power Cable - Plug Half

Dell Power Cable - Plug Half


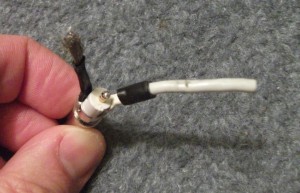
This is the plug half of the cut.  I’ve removed some sort of epoxy or hot-glue that held the above wires together in the form that fit inside the plastic shroud.  I think it’s hot-glue because it seems to hold the shroud over the plug.  I managed to pull the shroud off without cutting it, by running a unrolled paper clip around the edge, breaking the glue’s bond a little at a time.

As I expected, the outermost strands had all broken from repeated movement. You can see the random fraying in the strands at the top left.  Also, the center wire was clearly detached.  The 2nd conductor, white, on the right, was OK.

I’m not very good at soldering to plugs.  I tend to melt the plastic badly before getting the metal parts hot enough to solder.  So, instead of disconnecting the stubs left over in the image above and soldering directly to the plug,  I decided to trim them up and splice the wires together and inch or so from the plug. The middle wire I soldered directly.

Then I used hot glue to keep things from flexing, then wrapped it all with  electrical tape.  The end result is passable, but not pretty, so I won’t post a picture. And my Dell lives for another day… I’m using it to type this post now!

Comments appreciated!