After a month of off-and-on power issues with my Dell Inspiron 1525 Laptop, the A/C power adapter finally stopped powering the laptop. It had stopped being identified as an authentic Dell charger a couple months ago, as I wrote about here.
I was quite certain that the power cable had broken internally due to the constant flexing. It’s happened on almost every laptop that I’ve owned. Slightly jiggling the power cable approximately where it flexes during natural use would cut power to the laptop. Putting little stresses in the cable with twist ties would sometimes make the power work for a few days. These fixes were really temporary – they only put off the inevitable complete failure.
The options are to buy a band new authentic Dell PA-12 (or higher rated) power adapter for more than $100 directly from Dell, buy a 3rd party “compatible” charger for about $20 from eBay or DealExtreme.com (but I don’t trust 3rd party items when they plug into the household power… I don’t like fires), find a used authentic charger, or cut the cord and solder things up again.
So, the other day I cut the cable. Here are a couple pictures that might make it easier for anyone who needs to do this in the future.
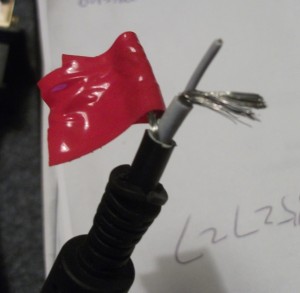
This is the cable half of the cut. You can see the top of the magnetic field minimizers… the name of which escapes me right now. There are three conductors. The tiny one in the center is for the chip in the PSU that tells the laptop whether or not the charger is an authentic Dell device – in my case, this broke months ago, when the Dell battery stopped charging – even after re-soldering, this charger still does not register as authentic; there must be another break further up the cable. Then two more layers of conductors. I’ve covered off the outermost in red tape as I prepare to re-solder things together.
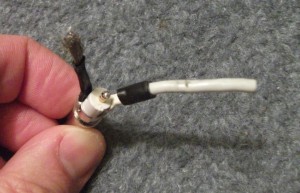
This is the plug half of the cut. I’ve removed some sort of epoxy or hot-glue that held the above wires together in the form that fit inside the plastic shroud. I think it’s hot-glue because it seems to hold the shroud over the plug. I managed to pull the shroud off without cutting it, by running a unrolled paper clip around the edge, breaking the glue’s bond a little at a time.
As I expected, the outermost strands had all broken from repeated movement. You can see the random fraying in the strands at the top left. Also, the center wire was clearly detached. The 2nd conductor, white, on the right, was OK.
I’m not very good at soldering to plugs. I tend to melt the plastic badly before getting the metal parts hot enough to solder. So, instead of disconnecting the stubs left over in the image above and soldering directly to the plug, I decided to trim them up and splice the wires together and inch or so from the plug. The middle wire I soldered directly.
Then I used hot glue to keep things from flexing, then wrapped it all with electrical tape. The end result is passable, but not pretty, so I won’t post a picture. And my Dell lives for another day… I’m using it to type this post now!
Comments appreciated!
Tags: 1525, ac, adapter, cable, charger, cut, dell, glue, inspiron, jack, laptop, PA-12, pictures, psu, solder, wires


March 5th, 2011 at 3:17 am
hi,
i’m experiencing a similar situation and
i was wondering whether you could give
me some advice. i uploaded a picture here
http://www4.picturepush.com/photo/a/5198352/img/5198352.jpg
the lines indicate how i’m intending to solder the wires.
am i doing it right ?
im not sure which wire goes where because when i got
the charger it was really messed up so it was impossible to map them
thank you :)
March 5th, 2011 at 10:23 am
Pi, yep, that looks right. Be careful, it looks like the outermost wire is about to contact the middle ring in your photo – the heat shrink wrap is supposed to separate the two.
June 5th, 2011 at 5:34 pm
I have a Compaq laptop with the same cable structure (coaxial) of the charger. I need to change the switch (which goes inside the laptop socket for charging) due to its broken pin in the center. But the replacement switch has no coaxial structure and has three cables colored red, black and white. How these two different cables could be connected?
Red to center or middle or outermost,
Black to center or middle or outermost, and
White to center or middle or outermost
:-) Thanks anyway
November 12th, 2015 at 11:36 pm
Update: I’ve since replaced the laptop, but it’s nice to have a second power supply. I bought an inexpensive replacement cable (just the cable, not the transformer) from eBay. On opening the PSU, which is thermally welded some how, i.e. you crack it open. When looking at the bottom of the PCB, the 3 pads for the wires (when oriented so that the pads are at the lower left) from left to right are “outside”, “centre pin”, and “inside”.
July 20th, 2018 at 3:30 pm
nice post